
How to install felt in a jewelry box?
Struggling to get that felt lining perfect inside your box? Wrinkles and messy glue can easily ruin your beautiful jewelry box project.
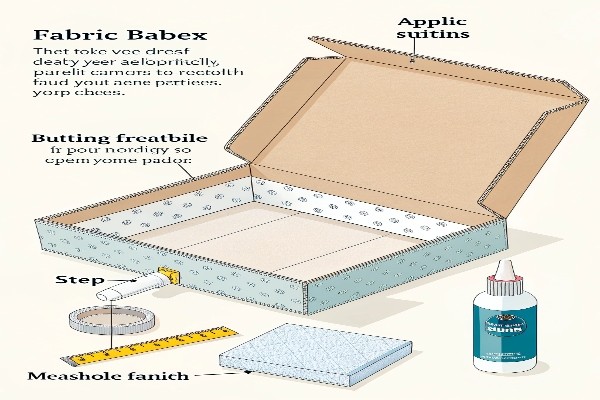
To install felt, first measure the inside surfaces of your box. Cut the felt pieces slightly smaller than your measurements. Apply a suitable adhesive evenly to one surface inside the box, then carefully press the corresponding felt piece into place, smoothing it out from the center.
Getting that professional, smooth finish by hand takes practice and patience. It's easy to end up with bumps or misaligned fabric. Let's explore some common questions about materials and techniques to help you master lining a box. We can also think about how this is done efficiently on a larger scale.
What's the Best Material for Lining a Jewelry Box?
Confused about lining options for your project? Choosing the wrong material might snag delicate jewelry or look cheap, spoiling the box's overall appeal.
Felt, velvet, or suedecloth are excellent choices for lining jewelry boxes. They are soft, effectively prevent scratches, and provide a luxurious feel, ensuring delicate items are well-protected inside the box.
!
Choosing the right lining material depends on the desired look, feel, and level of protection. Let's break down the popular options:
Comparing Lining Materials
| Material | Pros | Cons | Best For |
|---|---|---|---|
| Felt | Affordable, easy to cut, variety of colors | Can pill over time, less luxurious feel | General use, DIY projects, cost-effective |
| Velvet | Very soft, luxurious appearance | Can be harder to work with, shows dust | High-end jewelry, protecting delicate items |
| Suedecloth | Soft, durable, less prone to snagging | Can be more expensive than felt | Watches, items needing durable protection |
| Anti-Tarnish Cloth | Prevents silver tarnishing | Often less plush, specific function | Silver jewelry storage |
Felt is often the go-to for many crafters because it's forgiving and budget-friendly. Velvet instantly adds a touch of elegance, making the contents feel more special. Suedecloth offers a good balance of softness and durability. For silver items, specialized anti-tarnish cloth is ideal. While these are great options for personal projects, businesses producing many boxes need materials that can be applied consistently and quickly, often integrating this step into an automated production line. Sourcing reliable materials in bulk is also a key consideration 1.
How Do You Lay Fabric Smoothly Inside a Box?
Are you frustrated with bumps and wrinkles when lining boxes? An uneven fabric application can unfortunately make your finished product look unprofessional.
Measure your box interior precisely, then cut the fabric slightly smaller. Apply your chosen adhesive thinly and evenly. Start pressing the fabric down from the center, smoothing outwards carefully to eliminate air bubbles for a neat finish.
Achieving a perfectly smooth fabric lining requires careful preparation and application. I remember my first few attempts resulted in annoying wrinkles! Here’s a more detailed breakdown to help you avoid common pitfalls:
Step-by-Step Fabric Application
- Measure Carefully: Use a ruler or measuring tape to get the exact dimensions of each interior surface (bottom, sides).
- Cut Accurately: Transfer measurements to the fabric. Cut pieces about 1-2mm smaller on each side than the surface dimension. This prevents bunching in the corners. Use sharp scissors or a rotary cutter for clean edges.
- Choose Your Adhesive:
- Spray Adhesive: Good for large, flat areas but requires ventilation and careful masking.
- Fabric Glue (like PVA/White Glue): Allows repositioning but needs thin, even application to avoid bumps 2. A brush or roller helps.
- Double-Sided Tape: Clean application, good for edges, but can be harder to get perfectly flat on larger surfaces.
- Apply Adhesive: Apply a thin, consistent layer to the box surface, not the fabric (usually easier). Pay attention to edges and corners.
- Place Fabric: Carefully position the fabric piece, starting from one edge or the center.
- Smooth: Use your fingers, a clean cloth, or a small roller/brayer to smooth the fabric down. Work from the center outwards to push out any trapped air bubbles.
- Corners & Edges: For corners, you might need to make small relief cuts or fold the fabric neatly (like wrapping a gift). Press edges down firmly.
Patience is key here. Rushing often leads to mistakes. For businesses needing speed and perfection across thousands of units, manual application isn't feasible. Automated systems often handle gluing and placement with precision far exceeding manual capability 34.Have You Ever Wondered Why Jewelry Boxes Often Have Felt Lining?
Is that soft lining inside a jewelry box just for decoration? Understanding its real purpose reveals why it’s such a common and crucial feature for protecting valuable items.
Felt lining primarily protects jewelry from getting scratched or damaged. It also cushions items against minor impacts and can help prevent tarnishing. Additionally, it adds a touch of luxury and visual appeal.
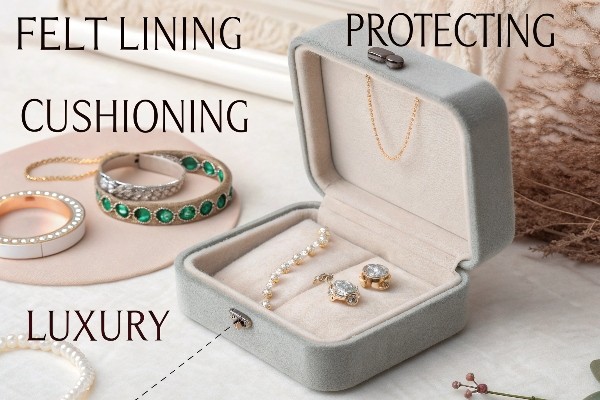
The soft lining, usually felt or velvet, serves several important functions beyond just looking nice. It's a standard feature in quality boxes for good reason.Key Roles of Felt Lining
- Scratch Prevention: This is the most obvious benefit. Hard surfaces like wood, plastic, or even cardboard can easily scratch precious metals, gemstones, and watch faces. Felt provides a soft, non-abrasive cushion. Think about a delicate gold chain sliding around – felt minimizes that friction.
- Impact Cushioning: While not designed for major drops, the lining offers a slight buffer against jostling and small impacts when the box is moved or items are placed inside. This helps prevent dents or chipping on fragile pieces.
- Tarnish Prevention (Sometimes): Some lining materials are chemically treated to absorb airborne sulfides, which cause silver and other metals to tarnish. While standard felt offers some barrier, specialized anti-tarnish cloths do this job best.
- Aesthetic Appeal: A soft, colored lining provides a beautiful contrast to the jewelry, making it stand out. It creates a sense of value and luxury, enhancing the presentation. Imagine opening a plain cardboard box versus one with a plush velvet interior – the experience is vastly different.
- Noise Reduction: It dampens the sound of jewelry clinking against the box sides.
Manufacturers understand that this protective and aesthetic element is vital for customer satisfaction, especially for luxury items like watches or fine jewelry 4. Ensuring a quality lining is part of producing a high-end finished product.Want to Make Your Own Felt-Covered Box?
Thinking of creating a custom felt-covered box yourself? It might seem straightforward, but getting those clean edges and a perfectly smooth finish requires attention to detail.
First, prepare or construct your base box. Measure all surfaces to be covered and cut your felt pieces, adding extra material for overlap at edges and corners. Apply adhesive evenly and carefully wrap or line the box, folding neatly.
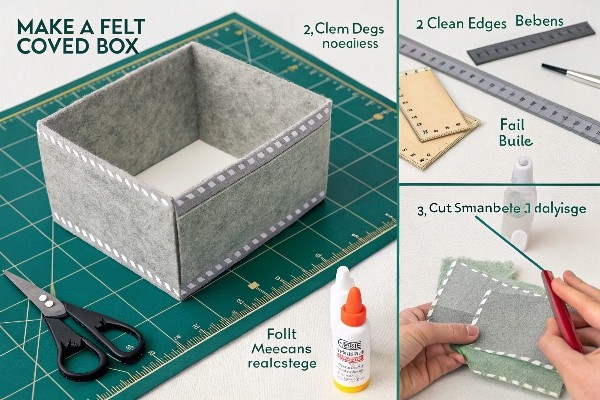
Creating a felt-covered box, whether lining the inside or covering the outside, is a rewarding craft project. Here’s a more detailed look at the process:Making a Felt-Covered Box: Key Steps
- Prepare the Box: Start with a sturdy cardboard, chipboard, or wooden box. Ensure surfaces are clean and smooth. If constructing the box yourself, using precise methods like V-grooving can create sharper, more professional-looking edges before covering [^6].
- Measure Everything: Measure each surface (inside or outside) that you intend to cover. Accurately note down the length, width, and height.
- Create a Pattern (Optional but Recommended): You can draw the box's net (unfolded shape) onto paper, then transfer this to the felt. Alternatively, measure and cut individual pieces for each surface. Remember to add allowance (e.g., 1-2 cm) where felt needs to wrap around edges or overlap.
- Cut the Felt: Use sharp scissors or a craft knife for clean cuts. Follow your pattern or measurements carefully.
- Apply Adhesive: Choose your glue (fabric glue, PVA, or sometimes hot glue for faster setting 2). Apply a thin, even layer to one section of the box at a time. Work methodically.
- Apply Felt:
- Lining: Place the felt pieces inside, smoothing from the center out, as discussed earlier.
- Covering: Position the felt on the outside surface. Smooth it down firmly. Wrap the overlap allowance around edges, folding corners neatly (mitered folds often look best). Secure the wrapped edges on the inside or underside of the box.
- Finishing Touches: Trim any excess felt carefully. Ensure all edges are glued down securely. Allow the adhesive to dry completely.
This process requires precision, especially at the corners and edges, to achieve a professional look. It's satisfying for a single project. However, for businesses needing to produce hundreds or thousands of high-quality, consistently finished boxes, manual covering is impractical. That's where automated machinery comes in, handling box forming, gluing, and wrapping with incredible speed and accuracy 34.Conclusion
Lining a jewelry box with felt protects valuables and adds a touch of class. While DIY is possible, achieving consistent quality requires care. For efficient, high-volume production, explore automated solutions.
As Jacob from Kylin Machine (www.kylinmachines.com), we specialize in advanced machinery for creating high-quality rigid boxes, including jewelry boxes, efficiently and precisely. Based in China, we serve the global packaging industry.
-
Sourcing materials like glue is part of the overall process support. ↩
-
Fully automatic machines are the best solution for making luxury packaging like jewelry boxes, watch boxes, and cosmetic boxes, using advanced systems for accuracy. (Paraphrased from reference document Details of 320A fully auto watch box machine ↩ ↩
-
Different adhesives like cold glue (PVA) and hot melt glue have different applications in box making and related processes Paraphrased from reference document detail of Ky-560 casing in machine ↩ ↩
-
Using a groove machine before folding cardboard can create sharper, higher-quality edges for rigid boxes compared to traditional die-cutting.Paraphrased from reference documentdetail of groove machine ↩ ↩ ↩
发表回复