
How to make cardboard boxes for gifts?
Struggling to find the perfect gift box? Want a personal touch without the high cost? Making your own cardboard gift box is simpler than you might imagine.
You can make gift boxes by measuring, cutting, folding, and gluing cardboard sheets. Using a template or precise measurements ensures a neat, sturdy box perfect for presenting your gifts beautifully.
Making a simple box yourself can be rewarding. It adds a personal touch that store-bought options lack. But what if you need a specific size or a more polished look? Let's explore how you can create the perfect cardboard gift box, from basic methods to achieving a truly professional finish.
How to create a gift box out of cardboard?
Need a custom-sized box right now? Don't want to buy one? You can craft a sturdy, attractive gift box using basic cardboard and tools you likely have.
Create a cardboard gift box by first choosing a template or designing your dimensions. Then, carefully cut the cardboard, score the fold lines accurately, fold precisely, and secure the edges with glue or tape.
Creating your own cardboard gift box involves a few key stages. It's a process that blends creativity with a bit of precision. Let's break it down.
Choosing Your Materials
The first step is selecting the right cardboard. The type you choose affects the box's sturdiness and appearance.
- Cardstock: Great for smaller, lighter gifts like jewelry or favors. It comes in many colors and finishes but offers less protection.
- Chipboard: Thicker and more rigid than cardstock, often used for shirt boxes or board game boxes. It provides more structure.
- Corrugated Cardboard: Best for heavier or fragile items needing protection. It's strong but bulkier and harder to achieve a refined look with simple tools.
Consider the gift's weight and fragility when choosing. For high-quality gift boxes, especially things like jewelry boxes, achieving a perfect finish often requires specific materials and techniques [^5].
Tools for the Job
You don't need much, but the right tools make the job easier and neater:
- Ruler or measuring tape
- Pencil
- Cutting tool (craft knife, box cutter, or sharp scissors)
- Cutting mat (highly recommended for safety and precision)
- Scoring tool (bone folder, blunt edge of butter knife, or empty ballpoint pen)
- Adhesive (strong craft glue, double-sided tape, or hot glue gun)
Precision Matters
Accuracy in measuring, cutting, and scoring is key to a box that fits together well. Even small errors can lead to gaps or a misshapen box. This is where patience pays off. For businesses creating many boxes, especially rigid boxes with a luxury feel, manual methods can be slow and inconsistent. Techniques like V-grooving, often done by machine, create perfectly sharp 90-degree folds for a superior appearance compared to traditional die-cutting [^2].
What are the steps in making a gift box?
Want to make your own gift box but unsure where to start? Following clear steps ensures success. It's a straightforward process once you understand the basics.
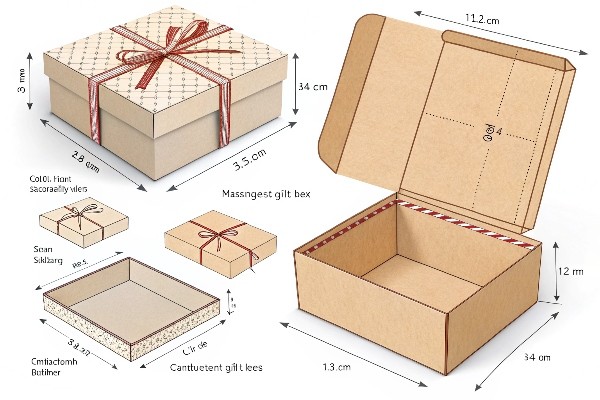
The basic steps are: Measure and mark your cardboard based on a template or design. Cut out the shape. Score the fold lines. Fold along the scored lines. Apply adhesive and assemble the box.
Let's walk through the process step-by-step to make it clear. Imagine we are making a simple box with a separate lid.
Step-by-Step Guide
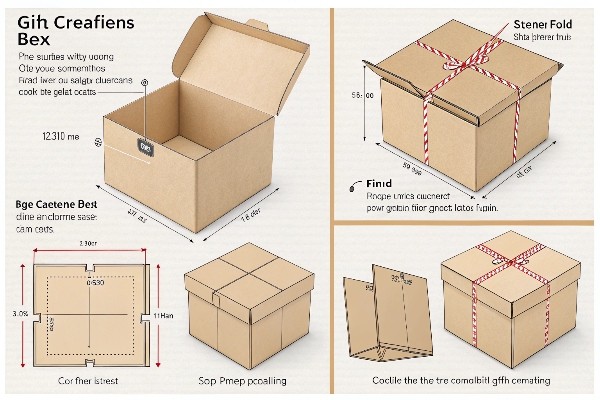
- Plan Your Box: Decide the finished dimensions (length, width, height). You'll need two pieces: one for the base and one slightly larger for the lid. A common method is to draw a cross shape (a net).
- Measure and Mark (Base):
- Draw a central rectangle matching your desired base dimensions (e.g., 6" x 4").
- Add squares/rectangles on all four sides for the box height (e.g., 2" high). The total shape will look like a cross. Ensure corner tabs for gluing.
- Measure and Mark (Lid): Repeat step 2, but make the central rectangle slightly larger (e.g., 6.1" x 4.1") and the height much smaller (e.g., 1" high). This allows the lid to fit over the base.
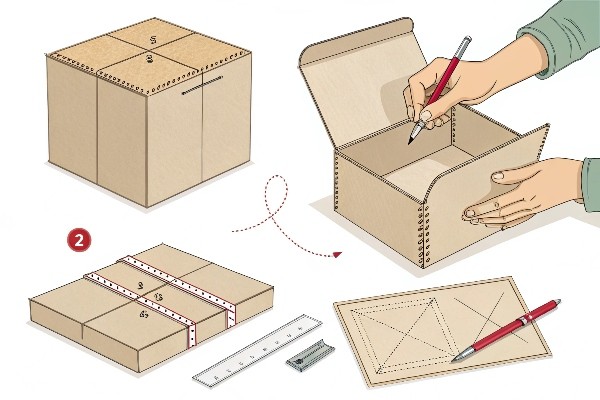
- Cut Out the Shapes: Carefully cut along the outermost lines using your cutting tool and mat. Precision here is vital.
- Score the Fold Lines: Using your scoring tool and ruler, press firmly along all the inner lines where the box needs to fold. Scoring creates a clean crease and prevents the cardboard from cracking.
- Fold: Gently fold along all scored lines, usually folding away from the scored indent to create sharp edges.
- Assemble: Apply adhesive to the corner tabs and press them against the inside of the adjacent side panels. Hold until secure. Assemble both the base and the lid.
- Finishing Touches: Let the glue dry completely. You can add decorations now or leave it plain.
While this manual process works, achieving consistent quality, especially for complex or rigid boxes used in packaging industries, often involves machinery for cutting, scoring (like V-grooving) [^2], corner pasting [^5], and forming [^3] to ensure speed and a professional look.
How to make a gift wrapper box?
Tired of plain boxes? Want something that looks festive right away? You can make a box that doubles as its own wrapping paper, adding extra flair.
Make a gift wrapper box by using decorative cardboard or paper from the start. Alternatively, cover a plain cardboard box with wrapping paper, fabric, or other embellishments during or after assembly.
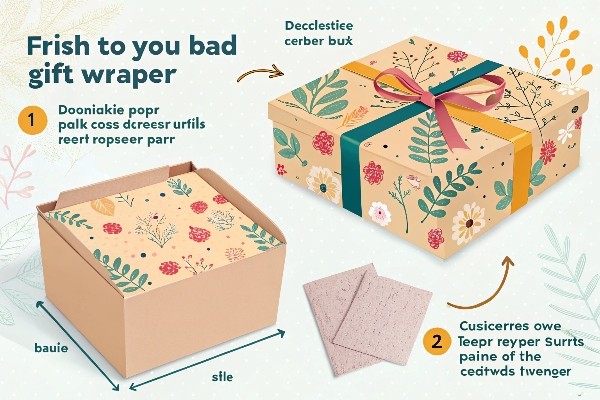
Creating a box that looks like a wrapped gift involves integrating decorative elements directly into the box-making process. It saves you the step of wrapping later!
Methods for a Wrapper Look
- Use Decorative Cardstock: Start with cardstock that already has a pattern, color, or texture you like. Build the box as usual, and the decoration is built-in. This is great for smaller boxes.
- Laminate Before Cutting: Glue decorative paper (like wrapping paper) onto your plain cardboard sheet before you measure, cut, and score. This gives a seamless finish.
- Apply glue evenly to the cardboard.
- Smooth the decorative paper carefully, avoiding bubbles. A tool like a brayer helps.
- Let it dry completely before proceeding with box construction.
- Cover Panels After Cutting: Cut out your box pieces from plain cardboard. Then, cut slightly smaller pieces of decorative paper and glue them onto the panels before assembly. This creates a framed look.
- Wrap the Finished Box: Construct a plain cardboard box first. Then, wrap it neatly with wrapping paper, just like a regular gift, but perhaps using more durable glue instead of tape for a permanent finish.
Adding Embellishments
Beyond the paper, consider adding:
- Ribbons tied around the box (you can incorporate slits into the box design to hold them).
- Bows, tags, or small decorative items glued on.
- Using specialized papers [^4] or materials for a unique texture.
For businesses producing decorative boxes [^3] or high-quality gift boxes [^6] in volume, applying covers and ensuring a bubble-free finish often involves machines like box forming machines [^3] or paper box pressing machines [^6] to achieve efficiency and a consistently professional appearance.
How to cut cardboard to make a box?
Struggling with ragged edges or inaccurate cuts? Cutting cardboard cleanly is crucial for a professional-looking box. How do you get those perfect lines every time?
Cut cardboard accurately by using a sharp blade (craft knife or box cutter), a sturdy metal ruler as a guide, and a protective cutting mat underneath. Apply steady, even pressure and make multiple passes for thicker cardboard.
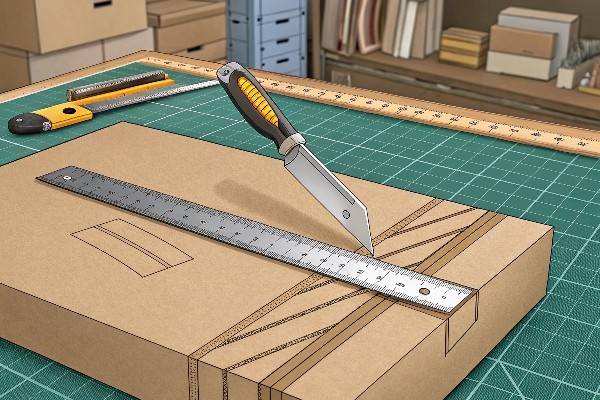
Cutting is arguably the most critical step where precision impacts the final product. Let's look at how to do it right and common techniques.
Tools and Techniques
- Sharp Blade: A dull blade tears rather than cuts. Use a craft knife (like an X-Acto) or a utility/box cutter with replaceable blades. Change blades frequently.
- Metal Ruler: A metal ruler provides a firm, straight edge that won't get nicked by the blade like plastic or wood. It also adds a layer of safety.
- Cutting Mat: Protects your work surface and provides a non-slip base. Self-healing mats are ideal.
- Steady Pressure: Hold the ruler firmly in place. Press the blade down with consistent pressure. Don't try to cut through thick cardboard in one go.
- Multiple Passes: For thicker cardboard (like corrugated), make several lighter passes along the same line instead of one forceful cut. This gives more control and a cleaner edge.
- Safety First: Always cut away from your body and keep fingers clear of the blade path.
Cutting vs. Scoring
It's vital to distinguish between cutting and scoring:
- Cutting: Goes all the way through the cardboard to separate pieces.
- Scoring: Creates an indentation along the fold line without cutting through. This allows the cardboard to fold cleanly. Use a bone folder, an empty pen, or the back of a knife blade (carefully!).
Achieving Professional Edges
For basic DIY boxes, careful manual cutting works. However, in commercial box making, especially for rigid boxes [^5] (like high-end gift boxes or jewelry boxes), achieving perfectly straight cuts and sharp, precise folds often relies on machinery.
| Technique | Description | Pros | Cons | Typical Use |
|---|---|---|---|---|
| Manual Cutting | Using hand tools (knife, ruler) | Low cost, accessible | Slow, requires skill, less precise | DIY, prototypes |
| Die Cutting | Using a shaped metal die to cut/score cardboard | Fast, consistent for high volume | Die cost, can crush edges slightly [^2] | Mass production |
| V-Grooving | Cutting V-shaped grooves where folds are needed | Creates sharp 90° folds, clean finish [^2] | Requires specialized machine [^5] | High-quality rigid boxes [^5] |
As mentioned in industry insights [^2], V-grooving results in a much cleaner, sharper edge profile compared to traditional die-cutting, which can sometimes leave slight recesses at the bottom edges. This V-grooving technique is particularly beneficial for luxury packaging like jewelry boxes, gift boxes, and book covers where appearance is paramount [^5]. If you're aiming for that truly premium feel, understanding these manufacturing techniques helps appreciate the difference professional equipment makes.
Conclusion
Making cardboard gift boxes is achievable with basic tools and care. Following steps for measuring, cutting, scoring, and assembling helps create personalized packaging for any occasion.
*As the owner of Kylin Machine, specializing in machinery for rigid boxes and book covers since 2003, I'
发表回复