
What materials are used to make boxes?
You just spent hours designing the perfect packaging. But when the box arrives, it falls apart before it even reaches your customer. The wrong material choice can destroy your brand reputation overnight.
Boxes are made from grey board (also called chipboard), kraft paper, coated paper, specialty paper, corrugated board, and adhesives like hot melt glue or water-based latex. The core material is grey board, wrapped with decorative cover paper, then bonded with industrial adhesive.

I remember the first time I walked into our factory floor in Dongguan back in 2003. Rolls of grey board stood stacked against the wall. Rolls of printed cover paper sat on shelves. Barrels of glue lined the corner. I realized then that making a box is simple in concept but deep in execution. Every material choice matters. Let me walk you through what goes into making boxes and how each material affects the final product. This knowledge comes from 20 years of running Kylin Packaging Machinery.
What materials do you use to create custom pre roll boxes?
You order 5,000 pre roll boxes for your new product line. The first batch arrives looking great. But after two weeks in storage, the corners start peeling and the paper warps. Now you have angry customers and dead inventory.
Custom pre roll boxes use grey board (1.5mm to 3mm thickness), coated art paper (128gsm to 200gsm) for the outer wrap, and strong hot melt adhesive. Some clients add a matte or gloss lamination for extra protection and premium feel.
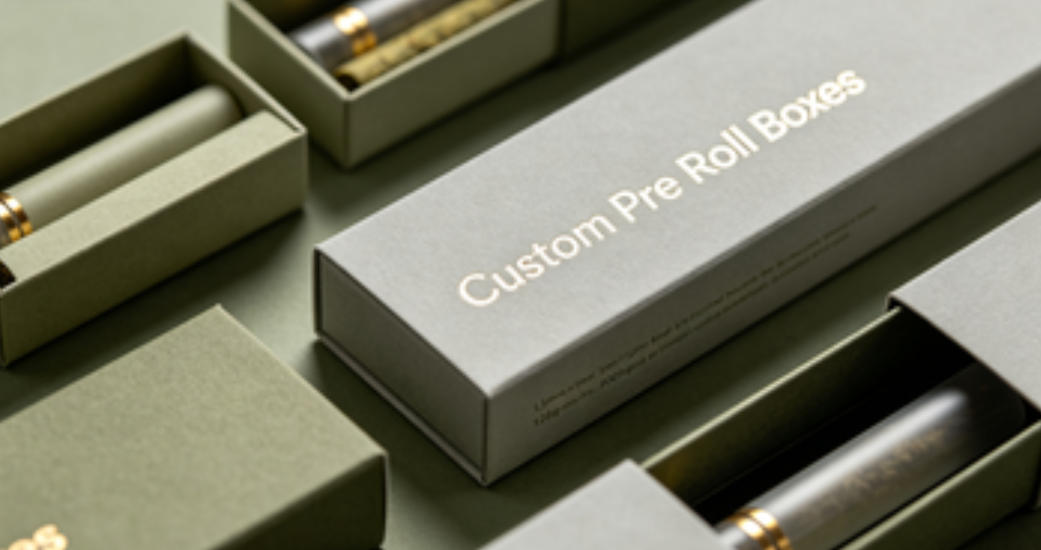
Understanding pre roll box material layers
Pre roll boxes are small but they need to protect fragile contents. That means every layer of material must work together. I learned this lesson the hard way in 2010 when a customer in Canada rejected an entire shipment because we used the wrong glue for their cold-climate storage. The boxes literally came apart in the warehouse.
The structure of a pre roll box is a three-layer sandwich. The inner layer is the grey board skeleton. We cut this board to exact size using a die-cutting press. Grey board comes in different thickness grades. For pre roll boxes, I always recommend 1.5mm to 2mm. This gives enough rigidity without making the box too bulky. Thicker board means higher cost and heavier shipping weight. Thinner board means your box will collapse under stacking pressure.
The middle layer is the adhesive. For pre roll boxes we use hot melt glue because it sets fast and bonds strong. The glue is heated to around 160°C in our machines and applied in a thin, even coat. A poor glue job means the cover paper will peel. At Kylin, our Glue Spraying Assembly Machine applies adhesive with ±0.1mm accuracy. This level of precision stops glue from bleeding through the paper and ruining the print.
The outer layer is the cover paper. Most pre roll brands pick coated art paper at 157gsm. This weight prints sharp colors and folds cleanly around corners. Some clients add a soft-touch lamination. Others pick a spot UV finish on the logo area. The paper must be flexible enough to wrap around edges without cracking. Yet it must be thick enough to hide the grey board underneath. Getting this balance right took me years of trial and error on the factory floor.
| Material Layer | Common Options | Key Consideration |
|---|---|---|
| Core Board | Grey board 1.5mm - 2mm | Thickness vs. weight trade-off |
| Adhesive | Hot melt glue | Fast setting, strong bond |
| Cover Paper | Coated art paper 128-200gsm | Print quality and fold durability |
| Surface Finish | Matte/gloss lamination, spot UV | Protection and premium feel |
How to make your own custom boxes?
You watch a YouTube video and think making boxes looks easy. You buy some grey board and glue. Three hours later your kitchen table is covered in crooked cuts, wrinkled paper, and sticky fingers. Now you understand why professional boxes cost money.
To make custom boxes, first cut grey board to size, then cut cover paper slightly larger. Apply glue evenly to the board surface. Position the board on the paper. Fold the edges over and press firmly at each corner. Use a bone folder for clean creases.
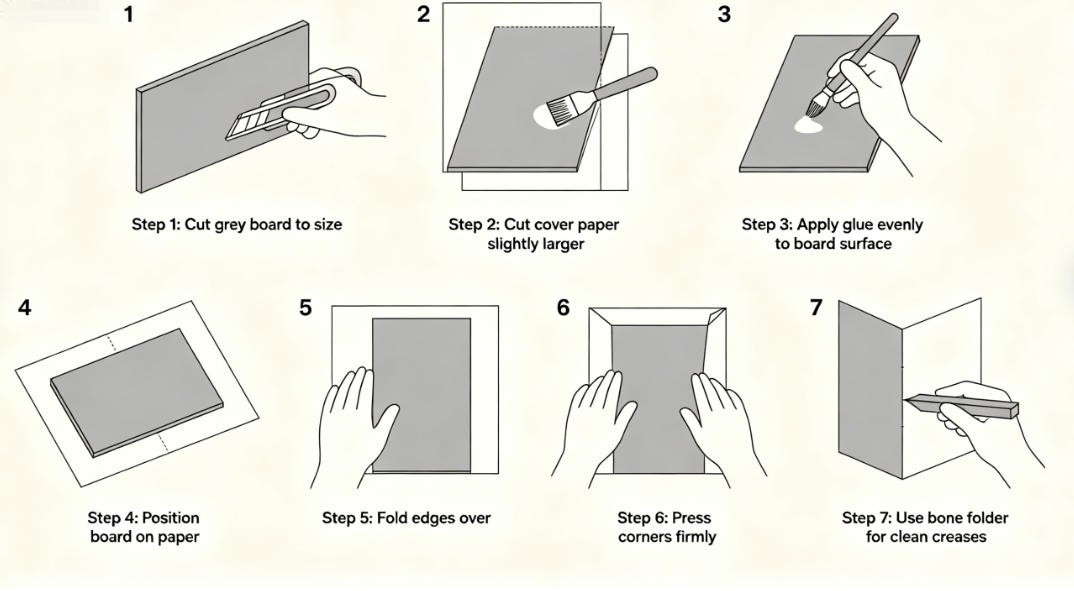
The step-by-step reality of box making
I have made thousands of boxes by hand in our early days at Kylin. Before we had automated machines, every box was crafted manually. I can tell you the process looks simple but the skill is in the details. The difference between a box that looks professional and one that looks handmade is about 0.5mm of precision at every fold.
Step one is cutting the grey board. You need a sharp utility knife and a metal ruler. The board must be cut perfectly square. Even a 1mm angle error will show up as a twisted box at the end. I used to mark my boards with a pencil and cut along a steel straightedge. Now our machines do this at 25 pieces per minute. But the principle stays the same. The board pieces are the skeleton. Get the skeleton wrong and the whole body looks deformed.
Step two is cutting the cover paper. The paper must be larger than the board by the thickness of the board on each side. For a 2mm board, you need about 15mm extra on every edge. This extra paper wraps around and covers the raw board edges. Too little paper and you will see grey board peeking through. Too much paper and you get bulky, ugly corners. Our Ky-380 Hard Cover Making Machine handles this calculation automatically. But when I do it by hand, I use a simple formula: board thickness times 2 plus 10mm.
Step three is gluing. Spread the adhesive in a thin, even layer across the entire board surface. Any bare spots will bubble up later. Any excess will bleed through the paper. At Kylin, we used to apply glue with a roller by hand. Now our machines maintain a constant glue temperature and spread rate. For DIY, I suggest using a small foam roller. It gives the most even coat.
Step four is positioning and wrapping. Lay the board glue-side down onto the cover paper. Press firmly from the center outward to push out air bubbles. Then fold each edge up and over. The corners are the hardest part. You need to fold the paper at 45 degrees before wrapping the sides. This creates a clean, mitered corner. A bone folder helps press the folds sharp. I still keep my old bone folder in my desk drawer. It reminds me where we started.
| DIY Step | Tool Needed | Pro Tip |
|---|---|---|
| Cut grey board | Utility knife, metal ruler | Cut 1mm outside the line, sand to exact size |
| Cut cover paper | Scissors or knife | Add 15mm extra on all sides |
| Apply glue | Foam roller | Thin even coat, no bare spots |
| Position board | Clean work surface | Press center outward to remove air |
| Fold edges | Bone folder | Miter corners at 45 degrees first |
What are the materials needed for making packaging?
You walk into a packaging trade show. Every booth shows off beautiful boxes in every shape and color. You ask ten different suppliers what materials they use and get ten different answers. You leave more confused than when you arrived.
Packaging production needs grey board (0.8-3mm), cover paper (80-400gsm), adhesive (hot melt or water-based), lamination film, and optional extras like ribbon, magnetic closure, foam insert, or window film. Industrial production also needs cutting dies and forming machines.
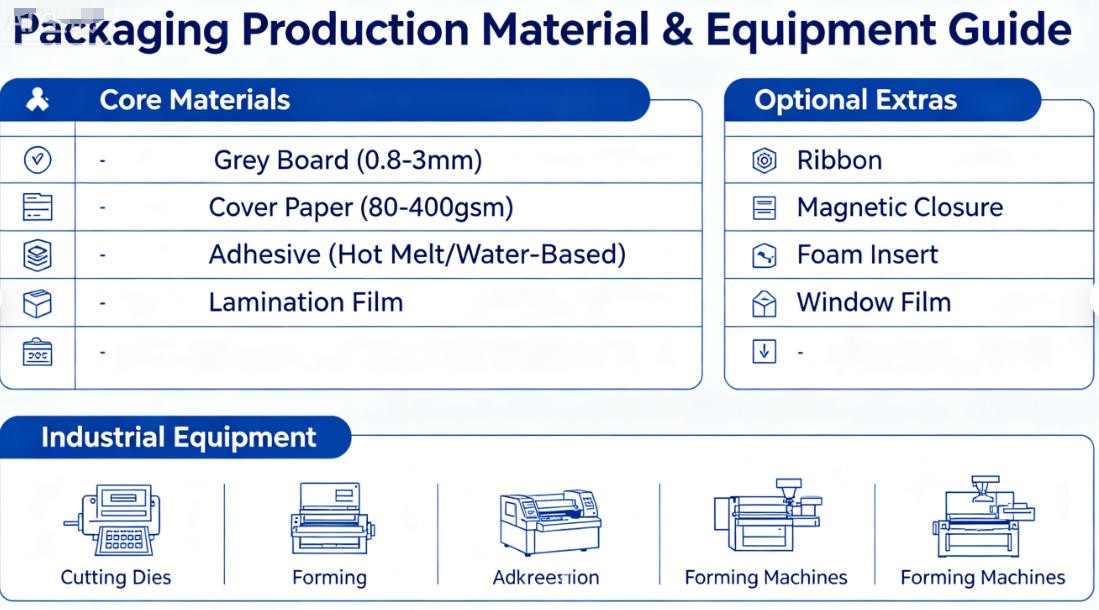
Building a complete packaging material supply chain
Running a packaging operation at scale means you need a reliable material supply chain. I have spent two decades building relationships with board mills, paper merchants, and adhesive suppliers across China. The quality of your finished box starts with the quality of your raw materials. I once saved 5% on grey board from a new supplier. Six months later every box had warping issues. That 5% saving cost me a 100% customer loss.
Grey board is the foundation. It is made from recycled paper pulp pressed into dense sheets. The quality grades range from A (best) to C (economy). Grade A board has consistent density and smooth surface. Grade C board has visible specks and uneven thickness. For premium rigid boxes, I only use Grade A board at 2mm to 2.5mm thickness. For economy boxes, 1.5mm Grade B board works fine. Our CCD Visual Anti-Mixing Detection Equipment checks every board piece before assembly. This stops wrong-grade board from entering production.
Cover paper is where the brand identity lives. Coated art paper gives vivid print colors. Kraft paper gives a natural, eco-friendly look. Specialty papers like linen-textured or metallic add luxury feel. The paper weight ranges from 80gsm for simple wraps to 400gsm for heavy-duty covers. I always tell my customers to match their cover paper to their brand story. A luxury brand needs textured specialty paper. A budget brand can use smooth coated paper with a matte lamination.
Adhesives are the invisible hero of packaging. Hot melt glue (EVA-based) works fast and holds strong. Water-based latex glue gives more open time for complex assemblies. The choice depends on your production speed and material combination. For our high-speed Glue Spraying Assembly Machine, hot melt is standard. For hand assembly of sample boxes, water-based glue gives more working time.
Then come the extras. Magnetic closures need a recess cut into the board. Ribbon pulls need a slot punched before wrapping. Foam inserts need a separate cutting station. Each extra adds cost and complexity. But each extra also adds perceived value that customers will pay for.
| Material Category | Options | Best For |
|---|---|---|
| Board | Grey board Grade A/B/C, 0.8-3mm | Box rigidity and structure |
| Cover Paper | Coated art, kraft, specialty, 80-400gsm | Brand look and print quality |
| Adhesive | Hot melt EVA, water-based latex | Bond strength and production speed |
| Lamination | Gloss, matte, soft-touch, anti-scratch | Surface protection and feel |
| Extras | Magnet, ribbon, foam, window film | Added value and function |
What materials are craft boxes made of?
You browse Etsy or a craft store and see beautiful handmade boxes. The description says "handmade craft box" but nothing about materials. You wonder if these are the same materials used in industrial boxes or something completely different.
Craft boxes use grey board, kraft paper, decorative scrapbook paper, PVA glue, and fabric lining. The difference from industrial boxes is in the finish. Craft boxes often use raw-edged board, visible stitching, hand-painted decoration, and natural materials like jute or cotton ribbon.
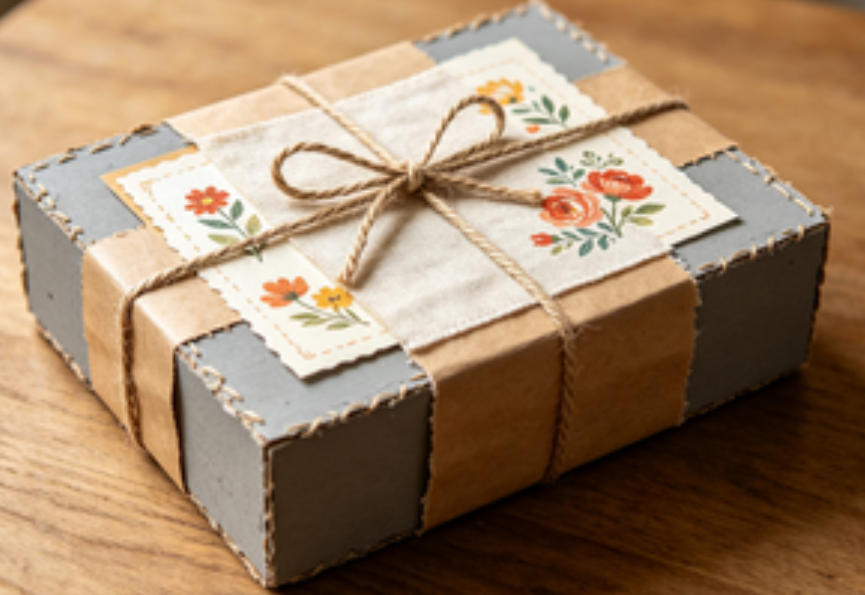
The artisan approach to box materials
Craft boxes sit at the intersection of function and art. I learned this from visiting small bookbinding studios in Italy and Korea. Their approach to materials is different from our factory approach. They pick materials for texture, color, and feel. We pick materials for consistency, speed, and cost. Both approaches make beautiful boxes. But the materials and methods differ.
The core board for craft boxes is still grey board. But craft makers often use thinner board, around 1mm to 1.5mm. They might even use book board, which is a higher-density version of grey board with a smoother surface. Some craft box makers skip the board entirely. They build boxes from heavy cardstock folded and glued into shape. This works for small jewelry boxes but would never survive shipping in an industrial setting.
The wrapping material is where craft boxes shine. Makers use handmade papers from Japan. They use vintage maps and sheet music. They use fabric like linen, cotton, and silk. Fabric wrapping needs a different glue technique. You cannot use hot melt glue on fabric because it soaks through and stains. You must use PVA glue applied with a brush and allowed to go tacky before positioning. At Kylin, our IPad Case Making Machine handles leather and fabric wrapping with servo-motor precision. But the principle is the same as hand craft. Material over board, glue in between, edges folded clean.
The inside lining of craft boxes is often fabric or decorative paper. Industrial boxes usually have paper lining or no lining at all. Craft boxes might have a padded insert covered in velvet. They might have dividers made from the same board and wrapped in matching paper. These details take time. A single craft box might take 30 minutes to produce by hand. Our machines make the same box in 30 seconds. The craft box costs more in labor but less in machinery.
Craft box makers also use different finishing materials. Beeswax for edge polishing. Gold leaf for gilding the board edges. Waxed cotton thread for visible binding. These materials connect the box to traditional bookbinding craft. They create a product that feels human-made. This is something no machine can fully replicate. But the machine can get close. Our Ky-380 Hard Cover Making Machine folds edges with the same precision that a craftsperson achieves by hand. It just does it 500 times in the time a craftsperson does one.
| Craft Material | Industrial Equivalent | Key Difference |
|---|---|---|
| Book board 1-1.5mm | Grey board 1.5-3mm | Smoother surface, lighter weight |
| Handmade paper | Coated art paper | Unique texture, lower color consistency |
| PVA glue (brush applied) | Hot melt (machine applied) | Longer open time, no equipment needed |
| Fabric (linen, cotton, silk) | Laminated paper | Richer feel, harder to automate |
| Decorative extras (beeswax, gold leaf) | Foil stamping, UV spot | Hand-applied, unique each time |
Conclusion
Box materials start with grey board, cover paper, and glue. The right combination of these three basics, plus the right machine or craft skill, determines whether your box impresses or disappoints.
发表回复